How To: Add a Drop Down Navigation Menu in Squarespace
How To Add a Drop Down Navigation Menu to Your Squarespace Website
Understanding Website Header Navigation:
Ever wondered how websites guide you around? Enter the ✨navigation menu✨. It's a menu, just like in a restaurant, but for a website – showing your visitors where to go and helping them find what you need.
A good menu simplifies things. It saves your visitors from wandering aimlessly and gets them straight to where you want them to go, making their user experience seamless and stress-free.
Drop-Down Menu:
Your website menu should have up to 6 key sections to create a user-friendly experience. So for websites with lots of pages, drop-down menu can be an excellent choice. It's like a categorized list, neatly organizing pages, so your visitors can navigate without feeling overwhelmed.
In the video below you will learn how to group multiple Pages into one section with the Drop- Down Secondary Navigation.
Creating a drop-down navigation menu is literally SO easy to do in Squarespace, and we can achieve that simply by using folders. Let me show you how.
Step 01.
When you log into your website and go under ‘Pages’, click a ‘+’ icon and find ‘Folder’.
Step 02.
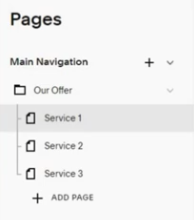
Name the folder, and then you have the option to either ‘+ Add Page’ and create a new one, or simply drag-and-drop existing pages into the newly created Folder.
Step 03.
The pages you add to your folder will automatically appear as a drop-down menu in your header navigation! You can change the order, add and remove pages from the drop-down navigation simply by dragging them arround.
Hope this was helpful! If you have more questions feel free to drop them under the video! 🤩


